How To Use Free Cloudflare SSL in Github Pages with Custom Domain?
We all love Github pages because it’s provided free static hosting with Amazon CDN. It also provides inbuilt SSL, just like wordpress.com (https://goyllo.wordpress.com) provide i.e. when you create new github pages, it already contains https like this https://goyllo.github.io .But if you are using a custom domain like me, then we need to use a third party website to make https in URL, and here we will use Cloudflare for that because it’s free.
Cloudflare provides free universal SSL for all webmasters, to improve security and web performance (by using cache functionality). It works everywhere; it does not matter, what you are using like static site generator Jekyll, Hugo, Gitbook, Octopress, Hexo, Pelican, Middleman, Blogger, Wordpress, etc. But Here, I will show you for github pages.
Why am I using Free SSL from Cloudflare?
I know Paid SSL is better than, free SSL because it provides end to end encryption, But I am using free SSL because I want to see, only green lock on my address bar, We already know how much secure is our static site :)
Also, HTTPS is part of the Google search ranking factor, it does silently boost your ranking in search results.
Its cache your static content, for example, just disconnect your internet connection, and load this page again, it will load again without any error i.e. less server load and better user experience.
Steps to Add Free SSL in github pages with Cloudflare.
First off go to cloudflare and create a new account.
Now, add your website, and further, they will give you two nameservers, that nameserver you need to add in your domain panel, so cloudflare can handle all DNS setting directly. So once you change your nameserver to cloudflare, you can’t do anything in your Domain Panel, for example, if you want to add an MX record or Txt Record, then you need to add them to the Cloudflare DNS setting menu. You can’t add them from your domain panel, because now, cloudflare handle your ALL DNS records, hope it makes sense.
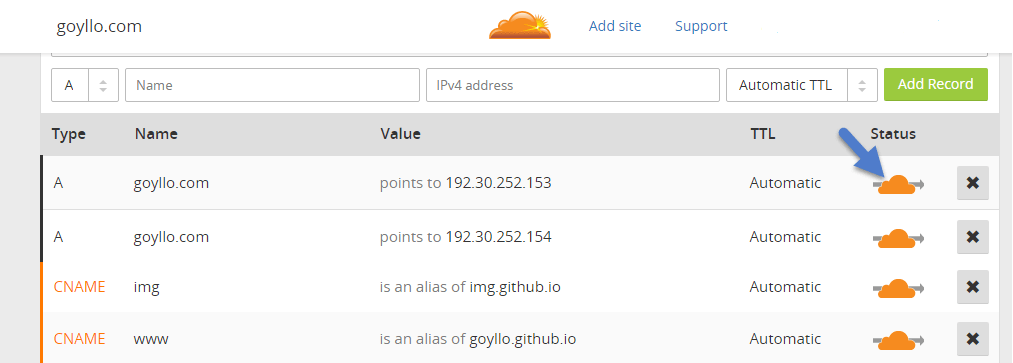
Now, add/import your all CNAME or other Records in Cloudflare DNS setting and don’t forget to click on status.

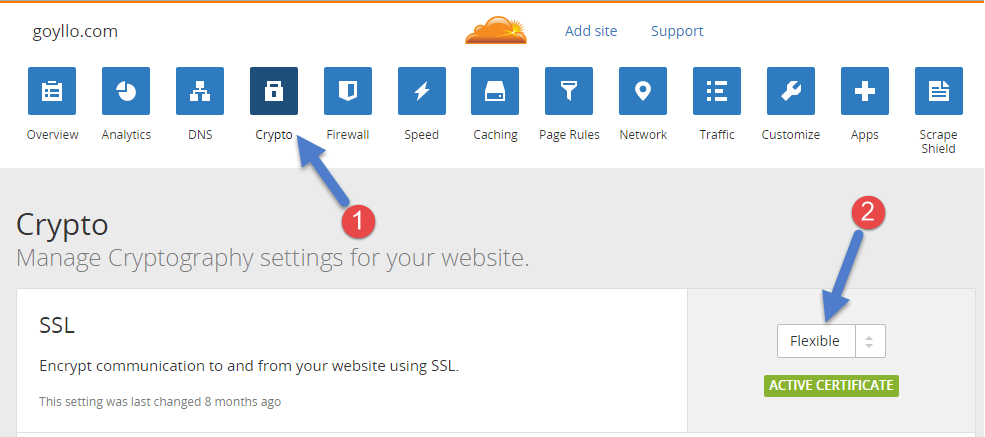
Now, go to crypto menu, and set flexible SSL, like this.

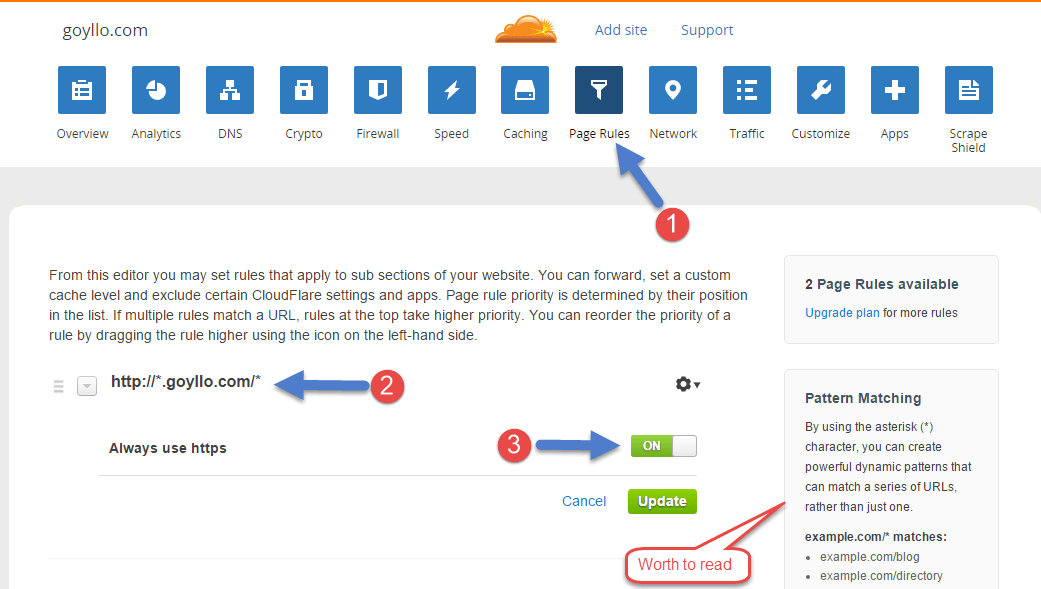
Now, go to Page Rules, and enter your pattern like this, http://*.goyllo.com/* and just click on always use https (when you click on always use https then other options will automatically hide) and now click on update.

Here we set force HTTPS in Page Rules, so whenever any people try to open your site, then it will automatically redirect to https (So no need to use any Javascript). Here I set asterisk sign (*) at subdomain because I am using two subdomains like www(for my main website - www.goyllo.com) and img (To Host Images - img.goyllo.com), so it automatically forces to use HTTPS in my all subdomain. But if you are using only one subdomain like blog.example.com then you can use this pattern – http://blog.example.com/*.Here we are using * at the end of the URL because it makes https in our all subdirectory or subfolder.
Configure your static site generator.
Well, if you are using a static site generator like Jekyll, Hugo, Hexo, etc. then don’t forget to add https in your config file, so your all the static content (like images, css, js) serves over HTTPS version. Otherwise, you will see the yellow icon in URL address bar, it indicates you are mixing http and https content, so make sure, your all content, should be served through https.
Set HTTPS in canonical link tag.
Canonical link tag helps to search engine to which page you want to index in a search result, for example, http version or https version, so make sure your canonical link should start with https version.
Look out my source page for reference. You will see this line.
<link rel="canonical" href="https://www.goyllo.com/cloudflare-ssl-for-github-pages/">
If you have any question? Put it down in comments :)